Using with Next.js
This guide walks through how to setup an Eppo Feature Flag on a client and server rendered component in a Next.js app. More specifically, this guide walks through the set up and settings of a sample Next.js app.
Architecture & support for hybrid rendering
Eppo offers the ability to use both client and server side rendering. Assignment can happen on either platform and the client SDK can be initialized with a configuration from your server SDK or from the Eppo CDN.
Loading flag configuration from CDN
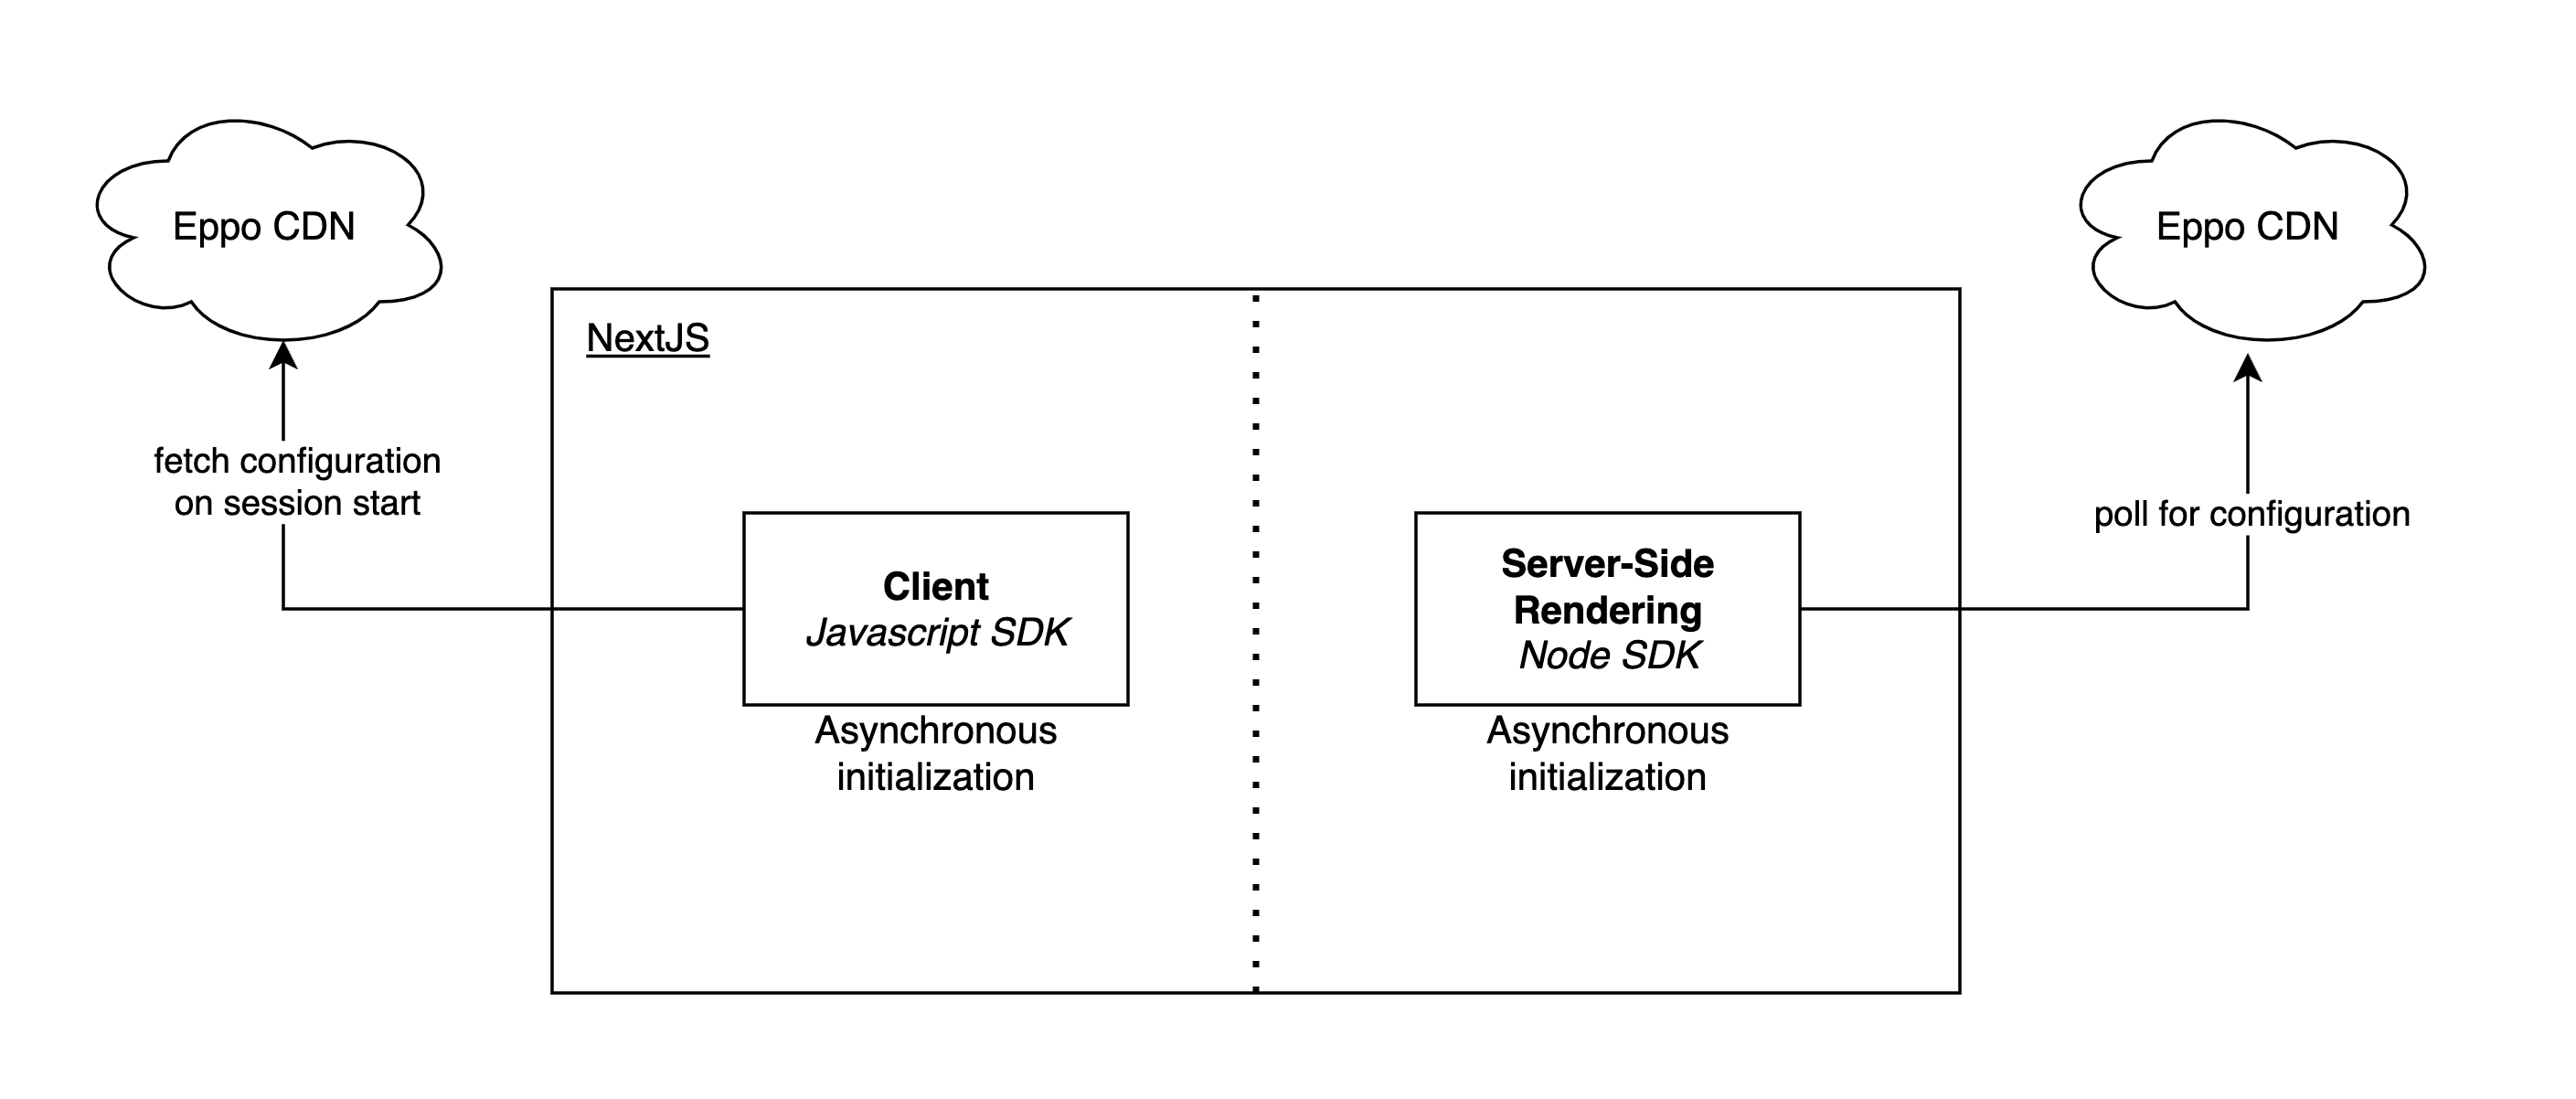
Using Eppo's CDN is the easiest way to get started. Flag configuration is cached at the edge and the architecture requires no additional development beyond integrating the SDK.
See sample code below for how to instantiate these SDKs.
Loading flag configuration from server SDK
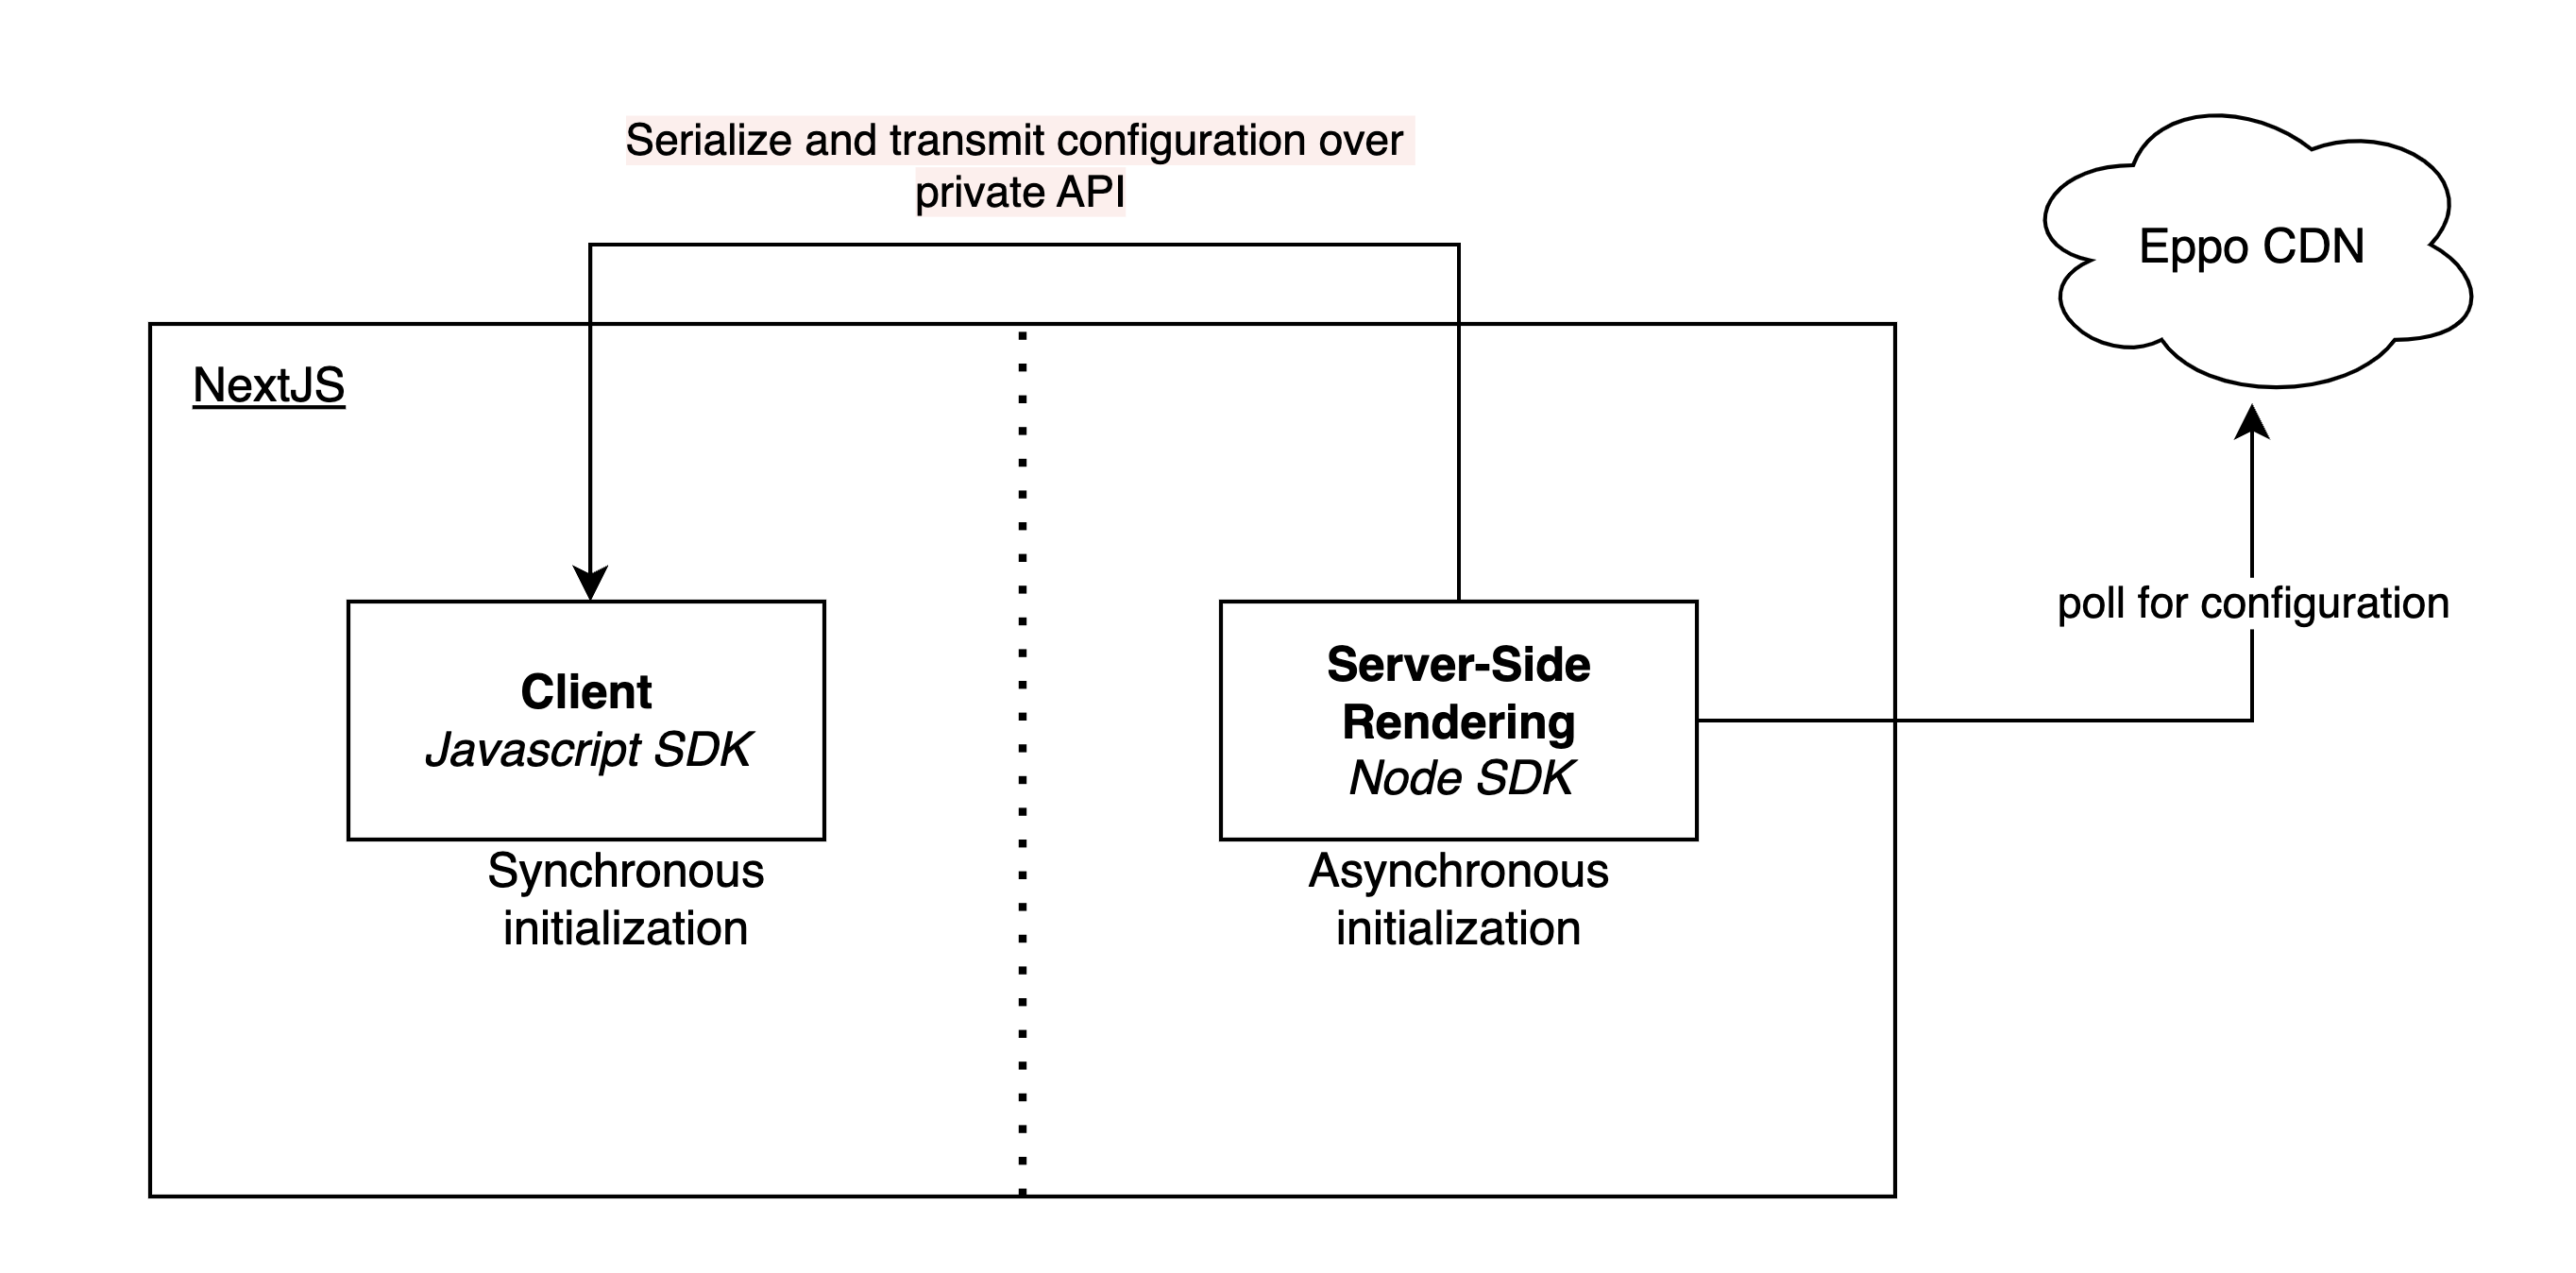
In some cases, you may want to load flag configuration from your server SDK. Serialize and transfer the configuration to the client SDK.
// Client
import { offlineInit, Flag, ObfuscatedFlag } from "@eppo/js-client-sdk";

// configuration from your server SDK
const configurationJsonString: string = getConfigurationFromServer();
// The configuration will be not-obfuscated from your server SDK. If you have obfuscated flag values, you can use the `ObfuscatedFlag` type.
const flagsConfiguration: Record<string, Flag | ObfuscatedFlag> = JSON.parse(configurationJsonString);

offlineInit({
  flagsConfiguration,
  // If you have obfuscated flag values, you can use the `ObfuscatedFlag` type.
  isObfuscated: true,
 });
This function is synchronous and ready to handle assignments after it returns.
Additional details are available in the offline initialization documentation for the client SDK. It is also possible to offline initialize the client SDK using a precomputed flags configuration, see offline (bootstrapped) precomputed assignments for more details.
Start a new Next.js React App
Create the Next.js app
npx create-next-app
Provide the following answers when prompted:
- What is your project named?
react-sdk-walkthrough - Would you like to use TypeScript?
Yes - Would you like to use ESLint?
Yes - Would you like to use Tailwind CSS?
No - Would you like to use
src/directory?No - Would you like to use App Router? (recommended)
Yes - Would you like to customize the default import alias (@/*)?
No
Run the Next.js app
cd react-sdk-walkthrough
yarn dev
Open a browser to the location output for local (e.g., http://localhost:3000)
Eppo flag setup
- Create and copy an SDK key in your Eppo app if you don't already have one.
- Create a feature flag in your Eppo app.
- Make sure your flag is turned on in the environment that correlates to your SDK key.
Client rendered component setup
Install the Eppo JS client SDK
yarn add @eppo/js-client-sdk
Create a randomization provider
In this section, we will create a provider based off our Usage in React documentation.
- Create a new
/appfile calledEppoRandomizationProvider.tsx - Copy and paste the following example code into
EppoRandomizationProvider.tsx:
import { ReactElement, useEffect, useState } from 'react';

import { init } from '@eppo/js-client-sdk';

interface IEppoRandomizationProvider {
  waitForInitialization?: boolean;
  children: ReactElement;
  loadingComponent?: ReactElement;
}

const EppoRandomizationProvider = ({
  waitForInitialization = true,
  children,
  loadingComponent = <div>Loading...</div>,
}: IEppoRandomizationProvider): ReactElement => {
  const [isInitialized, setIsInitialized] = useState(false);
  useEffect(() => {
    init({
      apiKey: '<SDK-KEY>',
      assignmentLogger: {
        logAssignment(assignment) {
          console.log('TODO: log', assignment);
        },
      },
    }).then(() => {
      return setIsInitialized(true);
    });
  }, []);

  if (!waitForInitialization || isInitialized) {
    return children;
  }
  return loadingComponent;
};

export default EppoRandomizationProvider;
- Replace
<SDK-KEY>placeholder with your SDK key
Create a component to use the randomization provider
- Create a new
/appfileOfferExperiment.tsx - Copy and paste the following code into the
OfferExperiment.tsxfile.
import { useMemo } from "react";
import { getInstance } from "@eppo/js-client-sdk";

const OfferComponent = () => {

    const subjectKey = "<SUBJECT-KEY>"

    const assignedVariation = useMemo(() => {
      const eppoClient = getInstance();
      return eppoClient.getStringAssignment("<FLAG-KEY>", subjectKey, <SUBJECT-ATTRIBUTES>, "<DEFAULT-VALUE>");
    }, []);

    return (
      <div>
        {assignedVariation === "control" && <p>50% off widgets!</p>}
        {assignedVariation === "test" && <p>Buy one widget get one free!</p>}
        {!assignedVariation && <p>Buy a widget today</p>}
      </div>
    );
  }

export default OfferComponent;
For the sake of demonstration purposes, there is a display other than control for the disabled/error case which is the "Buy a widget today!" text. In most implementations, we’d default to control in that situation like so:
<h1>
  {(!assignedVariation || assignedVariation === 'control') && (
    <p>50% Off widgets!</p>
  )}
  {assignedVariation === 'test' && <p>Buy one widget, get one free!</p>}
</h1>
- Copy and paste your flag key into the
getStringAssignment()method, along with a user id, user attributes, and default variation value.
Use the component in the application
- Put the offer component under the logo in
page.tsx
Below is a snippet from what you will see in your page.tsx and where you should place the offer component:
<div className={styles.center}>
  <Image
    className={styles.logo}
    src="/next.svg"
    alt="Next.js Logo"
    width={180}
    height={37}
    priority
  />
</div>

// Offer component will go here
- Include the following line at the top of
page.tsxto tell the Next.js app to treat the page as a client component (e.g., it is not server-side rendered, and can use react hooks)
'use client'; // Mark this file as a Client Component
- Import our offer experiment component
import OfferExperiment from './OfferExperiment';
- Add it to the page
<div className={styles.center}>
  <EppoRandomizationProvider>
    <OfferExperiment />
  </EppoRandomizationProvider>
</div>
Since the experiment is off, we should get the default experience

- Turn the flag on in Eppo
- Change the subject key to see the other experience
const subjectKey = 'TODO-A';

Server rendered component setup
Install Eppo Node SDK
Follow the instructions to create your Next.js app as outlined in the previous section. For server-rendered components, we'll also need to install Eppo's Node.js SDK.
yarn add @eppo/node-server-sdk
- Next.js App Router
- Next.js Pages Router
The following assumes that you chose to use App Router when generating your Next.js app.
Would you like to use App Router? (recommended) Yes
SDK initialization
Create a new app/shared/get-eppo-client.ts file to handling SDK initialization. This file will reside in a new app/shared folder that will contain helpers for server-rendered components. Copy the code snippet below. The init function is called outside of the getEppoClient scope so that it's only called once.
'use server'; // directive needed for server-side rendering

import { init } from '@eppo/node-server-sdk';

const eppoClientPromise = init({
  apiKey: '<SDK-KEY>', // SDK keys defined at https://eppo.cloud/feature-flags/keys
  assignmentLogger: {
    logAssignment(assignment) {
      console.log('TODO: log ', assignment);
    },
  },
}).catch((err) => {
  console.error('Error initializing Eppo SDK:', err);
});

export default async function getEppoClient() {
  return await eppoClientPromise;
}
String assignment helper
Let's also create a helper function for fetching string assignments. This helper will ensure that the Eppo SDK is initialized before returning a value. To do this, create a new app/shared/get-string-assignment.ts file, and add the code snippet below.
'use server'; // directive needed for server-side rendering

import getEppoClient from './get-eppo-client';

export default async function getStringAssignment(
  flagKey: string,
  subjectKey: string,
  subjectAttributes: Record<string, string> = {},
  defaultValue: string = ''
): Promise<string> {
  const eppoClient = await getEppoClient();
  return (
    eppoClient?.getStringAssignment(
      flagKey,
      subjectKey,
      subjectAttributes,
      defaultValue
    ) ?? defaultValue
  );
}
Rendering the flag assignment
Next, we'll need to create a component that uses our flag variation. Create a new app/OfferExperement.tsx file, and add the snippet below. We’ll pass the assigned flag variation to the component, rather than fetching the assigned variation within the component.
import type { FunctionComponent } from 'react';

interface OfferExperimentProps {
  variation: string;
}

export const OfferExperiment: FunctionComponent<OfferExperimentProps> = ({
  variation,
}) => (
  <h1>
    {variation === 'control' && <p>50% Off widgets!</p>}
    {variation === 'test' && <p>Buy one widget, get one free!</p>}
    {!variation && <p>Buy a widget today!</p>}
  </h1>
);

export default OfferExperiment;
Putting it all together
In app/page.tsx, remove any 'use client' directive if there is one. Then, add the logic that will retrieve the flag assignment and render our OfferExperiment component. Our app/page.tsx file should look similar to the following example.
import styles from './page.module.css';
import OfferExperiment from './OfferExperiment';
import getStringAssignment from './shared/get-string-assignment';
export default async function Home() {
const flagKey = '<FLAG-KEY>'; // defined in your flag configuration (https://eppo.cloud/feature-flags)
const subjectKey = '<SUBJECT-KEY>'; // ideally populated from something like login context
const offerVariation = await getStringAssignment(flagKey, subjectKey);
return (
<main className={styles.main}>
<div className={styles.description}>
<p>
Get started by editing
<code className={styles.code}>app/page.tsx</code>
</p>
<div className={styles.center}>
<OfferExperiment variation={offerVariation} />
</div>
{/* (other components) */}
</div>
{/* (other components) */}
</main>
);
}
The following assumes that you chose not to use App Router when generating your Next.js app.
Would you like to use App Router? (recommended) No
SDK initialization
Create a new shared/get-eppo-client.ts file to handling SDK initialization. This file will reside in a new shared folder that will contain helpers for server-rendered components. Copy the code snippet below. The init function is called outside of the getEppoClient scope so that it's only called once.
import { init } from '@eppo/node-server-sdk';

const eppoClientPromise = init({
  apiKey: '<SDK-KEY>', // SDK keys defined at https://eppo.cloud/feature-flags/keys
  assignmentLogger: {
    logAssignment(assignment) {
      console.log('TODO: log ', assignment);
    },
  },
}).catch((err) => {
  console.error('Error initializing Eppo SDK:', err);
});

export default async function getEppoClient() {
  return await eppoClientPromise;
}
String assignment helper
Let's also create a helper function for fetching string assignments. This helper will ensure that the Eppo SDK is initialized before returning a value. To do this, create a new shared/get-string-assignment.ts file, and add the code snippet below.
import getEppoClient from './get-eppo-client';

export default async function getStringAssignment(
  flagKey: string,
  subjectKey: string,
  subjectAttributes: Record<string, string> = {},
  defaultValue: string = ''
): Promise<string> {
  const eppoClient = await getEppoClient();
  return (
    eppoClient?.getStringAssignment(
      flagKey,
      subjectKey,
      subjectAttributes,
      defaultValue
    ) ?? defaultValue
  );
}
Rendering the flag assignment
Next, we'll need to create a component that uses our flag variation. Create a new components/OfferExperement.tsx file, and add the snippet below. We’ll pass the assigned flag variation to the component, rather than fetching the assigned variation within the component.
import type { FunctionComponent } from 'react';

interface OfferExperimentProps {
  variation: string;
}

export const OfferExperiment: FunctionComponent<OfferExperimentProps> = ({
  variation,
}) => (
  <h1>
    {variation === 'control' && <p>50% Off widgets!</p>}
    {variation === 'test' && <p>Buy one widget, get one free!</p>}
    {!variation && <p>Buy a widget today!</p>}
  </h1>
);

export default OfferExperiment;
Putting it all together
In pages/index.tsx, add the logic that will retrieve the flag assignment in the getServerSideProps function. We'll then render our OfferExperiment in the page component. Our pages/index.tsx file should look similar to the following example.
import styles from '@/styles/Home.module.css';
import OfferExperiment from '../components/OfferExperiment';
import getStringAssignment from '../shared/get-string-assignment';
import type { InferGetServerSidePropsType, GetServerSideProps } from 'next';
export const getServerSideProps = (async () => {
const flagKey = '<FLAG-KEY>'; // defined in your flag configuration (https://eppo.cloud/feature-flags)
const subjectKey = `<SUBJECT-KEY>`; // ideally populated from something like login context
const offerVariation = await getStringAssignment(flagKey, subjectKey);
return { props: { offerVariation } };
}) satisfies GetServerSideProps<{ offerVariation: string }>;
export default function Home({
offerVariation,
}: InferGetServerSidePropsType<typeof getServerSideProps>) {
return (
<main className={styles.main}>
<div className={styles.description}>
<p>
Get started by editing
<code className={styles.code}>pages/index.tsx</code>
</p>
<div className={styles.center}>
<OfferExperiment variation={offerVariation} />
</div>
{/* (other components) */}
</div>
{/* (other components) */}
</main>
);
}
If your development server is not yet running, run yarn dev. You should now see your experiment running with the new server rendered component.
Troubleshooting
Turbopack bundling issue (Next.js 16.0.2+)
Problem:
If you're using Next.js 16.0.2-canary.7 or later (including 16.0.3+) with Turbopack, you may encounter build errors caused by Turbopack over-aggressively bundling the thread-stream package. This includes test files, LICENSE, README, and other non-code assets that should not be bundled.
Error manifestation:
Build failures with errors like:
Module not found: Can't resolve 'why-is-node-running'

./node_modules/.pnpm/thread-stream@3.1.0/node_modules/thread-stream/test/helper.js:33:15
This occurs because Turbopack is incorrectly bundling test files from the thread-stream package, which should never be included in your application bundle.
Why this happens:
The @eppo/node-server-sdk depends on Pino for logging, which uses dynamic imports and worker_threads. A fix for Next.js issue #84766 made Turbopack trace worker threads more aggressively, which inadvertently caused Next.js issue #86458 where test files from thread-stream get bundled.
Solution:
Add the following to your next.config.ts (or next.config.js) file to treat Pino and its dependencies as external packages:
const nextConfig = {
  serverExternalPackages: ['pino', 'pino-pretty', 'thread-stream'],
  // ... other config options
};

export default nextConfig;
This tells Next.js to treat these packages as external dependencies and not bundle them with Turbopack.
Note: Webpack builds are not affected by this issue, as Webpack handles dynamic Pino imports correctly via the package.json files field.