Integrating with Webflow
In this tutorial, we learn how how run landing page tests in Webflow after minimal engineering setup. At a high level, we add a client side version of Eppo’s Javascript SDK as a script in your Webflow workspace that:
- Initializes the Eppo JS client
- Handles experiment assignment logic
- Dynamically updates pre-defined content variables such as text and image URLs
Prerequisites:
- Eppo account
- Webflow account
- Client-side analytics platform like Segment, Amplitude, Adobe, Mixpanel, etc., to capture Eppo assignment events and send them to your data warehouse for analysis
Setting up Eppo
Set up an feature flag in Eppo — for step by step instructions, follow our quickstart. We will be using JSON flag type to fill in the content on our Webflow landing page. For the sake of this tutorial, make JSON-typed variations that have the same keys as below:
{
  "title": "These are the droids you're looking for",
  "image": "obi-wan.jpg",
  "subtitle": "We have more droids than you can shake a light saber at",
  "cta": "Browse Droids"
};
You can make the values of the variation whatever makes sense for your use case, or you can use our example from our prototype below:

Once you have your feature flag setup, set your feature flag up as an experiment. Once you have data flowing to your data warehouse from your feature flag, you will be able to analyze your results.
Setting up Webflow
For the purposes of this tutorial, we will be very explicit on what things to test in your Webflow experiment. Keep in mind that all of the specific elements we’re testing are extendable to anything in your Webflow Environment.
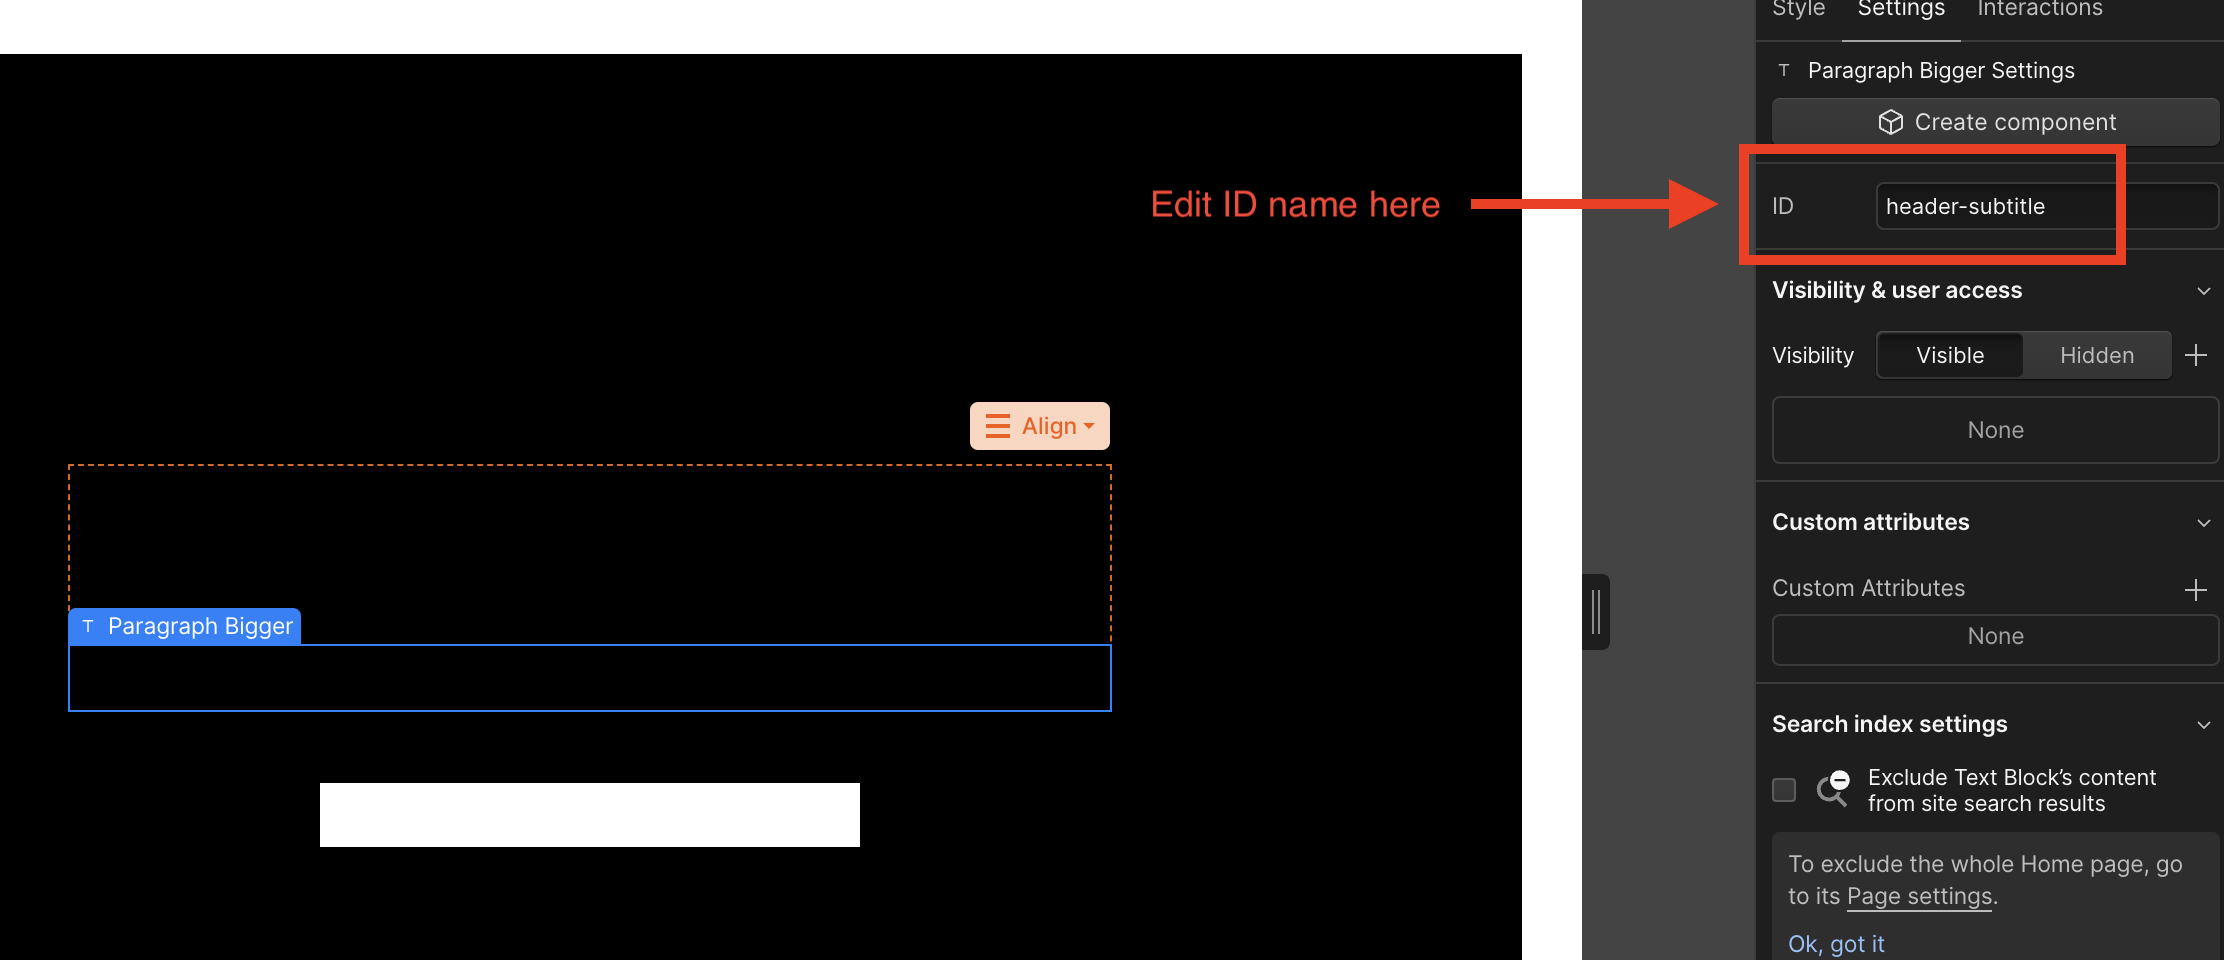
First, set up a Webflow landing page that has the following elements: a Header Title, a Header Subtitle, a Header CTA, and an image element. These elements should have no content in them for now since we will be filling in the image URL and messaging from our feature flag. As you are setting up these elements, make sure that you give each of the 4 elements one of the following custom ids: header-subtitle, header-title, header-CTA, and header-image. The custom code we add later specifically looks for these ids to write in the content from Eppo. See the screenshot below on where to update the ID for an element:
Next, add the following code to your custom code at the site level in the footer:
By making sure our elements are “blank” to start with, we can completely reduce any flicker that would be caused by re-writing and element with Javascript. Make sure that you build in logic for default experience in the case that Eppo serves a null variation.
<script src="https://cdn.jsdelivr.net/npm/@eppo/js-client-sdk@latest/dist/eppo-sdk.min.js"></script>

<script>
// Prep post-assignment code
function setHeader() {

  // Default assignment data
  const defaultVariationData = {
    title: "default title",
    image: "https://defaultimage.png",
    subtitle: "default subtitle",
    cta: "default call to action"
  };

  // Update with your own user context
  const subjectId = "<SUBJECT-ID>"; // Ideally this would be an ID managed by your analytics tool such as GA, Rudderstack, or Segment id to name a few
  const subjectAttributes = {};

  // Get variation data from Eppo
  const variationData = window.eppo.getInstance().getJSONAssignment(
    '<FEATURE-FLAG-KEY>',
    subjectId,
    subjectAttributes,
    defaultVariationData
  );

  document.getElementById('header-title').innerText = variationData.title;
  document.getElementById('header-subtitle').innerText = variationData.subtitle;
  document.getElementById('header-cta').querySelector('div').innerText = variationData.cta;

  const headerImageDiv.style.backgroundImage = 'url('+variationData.image+')';
  headerImageDiv.style.backgroundImage = 'url('+headerSrc+')';
  headerImageDiv.style.backgroundPosition = 'center center';
  headerImageDiv.style.backgroundRepeat = 'no-repeat';
  headerImageDiv.style.backgroundSize = 'auto 100%';
}

// Assignment Logger
const IAssignmentLogger = {
  logAssignment(assignment) {
    // Add client side analytics tracking call to capture experiment data
    // and make sure assignment data is sent to your
    // data warehouse that is connected to Eppo.
    console.log(assignment)
  }
};

// Init Eppo Client
opts = {apiKey: '<EPPO-SDK-KEY>', assignmentLogger: IAssignmentLogger};
window.eppo.init(opts).then(setHeader);
</script>
- Provide your SDK key and Feature Flag key in the
'<SDK-KEY>'and'<FEATURE-FLAG-KEY>'placeholders above. - Provide the id you are going to use for analytics logging to
'<SUBJECT-ID>'. Ideally this would be an id from a managed platform such as Segment, Rudderstack, Google Analytics, or an internal platform. - Add your client side analytics tracking call once the assignment has been made. Make sure your analytics platform is sending data to your data warehouse connected to Eppo. This will ensure that assignments made by Eppo will be tracked and can be used for experiment analysis. For more information on Eppo's event logging integrations with popular platforms like Segment, mParticle, Rudderstack, and Snowplow, see our documentation here.
Edge cases
Cookie Policies
If you end up using a subject key or user traits from a cookie, make sure that the experiment is designed around the user's response to your cookie policy. To avoid a user seeing a page with missing components, make sure there is a consistent user experience between initial page load and when they are eligible to see the experiment. As a best practice, we typically recommend using a modal or interstitial to block the rest of the page, and therefore experiment, until the user has responded to your site's cookie policy.
Demo
To see a demo of the Webflow integration in action, see this link: https://star-wars-demo.webflow.io/.