Connecting Snowflake
Preparing your Warehouse for Eppo
Before you connect Eppo to your data warehouse, it is recommended that you create a service User for Eppo. This service User should then be used to connect Eppo to your warehouse.
Additionally, you will need to create a schema for Eppo to write intermediary tables to, as well as grant the service User read access to tables you'd like Eppo to query SQL definitions from.
Eppo supports connecting via a service account password, key-pair or encrypted key-pair authentication.
1. Create a Service User for Eppo
- Log into Snowflake with a user that has
ACCOUNTADMINprivileges. - Create a user with the following command. If using a password, replacing
<password>with a unique, secure password:
USE ROLE ACCOUNTADMIN;
CREATE ROLE IF NOT EXISTS eppo_role;
CREATE USER IF NOT EXISTS eppo_user
PASSWORD = ‘<password>’;         -- If using a password
RSA_PUBLIC_KEY = '<public_key>'; -- If using key-pair authentication
GRANT ROLE eppo_role TO USER eppo_user;
ALTER USER eppo_user
SET DEFAULT_ROLE = eppo_role;
- Grant this user the appropriate privileges for any tables we will need to access. This generally includes your assignment or exposure events, fact tables from which your metrics are derived, and dimension tables that you commonly use in your analyses.
GRANT USAGE ON DATABASE <database> TO ROLE eppo_role;
GRANT USAGE ON SCHEMA <schema> TO ROLE eppo_role;
GRANT SELECT ON TABLE <schema>.<table1> TO ROLE eppo_role;
GRANT SELECT ON TABLE <schema>.<table2> TO ROLE eppo_role;
...
GRANT SELECT ON TABLE <schema>.<tableN> TO ROLE eppo_role;
2. Create Schema for Eppo to Write Results to
- Create a schema for Eppo to write intermediate results and temporary tables.
CREATE SCHEMA IF NOT EXISTS eppo_output;
GRANT ALL ON SCHEMA eppo_output TO ROLE eppo_role;
- (Optional) Create a warehouse for Eppo to use
CREATE WAREHOUSE IF NOT EXISTS eppo_wh
WAREHOUSE_SIZE = <wh_size>
AUTO_SUSPEND = 300
INITIALLY_SUSPENDED = true;
GRANT ALL PRIVILEGES ON WAREHOUSE eppo_wh TO ROLE eppo_role;
While giving Eppo a dedicated warehouse is optional, please ensure that Eppo has access to at least one warehouse to use for computing results. This warehouse will need to be provided when adding Snowflake credentials to Eppo's UI in the steps below.
- (Optional) Add Eppo’s static IP addresses to your Network Policy if you have one:
| IP Address |
|---|
34.133.196.109 |
35.226.89.62 |
34.41.172.201 |
34.29.62.236 |
34.132.152.78 |
35.232.0.89 |
34.41.154.239 |
146.148.74.70 |
34.121.71.161 |
34.70.156.102 |
35.239.118.244 |
34.132.46.38 |
35.238.158.100 |
34.42.48.99 |
34.134.43.217 |
34.134.2.209 |
34.134.152.212 |
35.225.36.104 |
34.31.169.195 |
34.134.214.137 |
34.30.65.165 |
34.28.215.125 |
35.193.17.22 |
34.27.118.169 |
Connecting your Warehouse to Eppo
Now that you have a proper Service User created for Eppo, you can use it to connect Eppo to your warehouse.
Initial Configuration of Credentials
- Log in to your Eppo account at eppo.cloud
- Click the
Getting Startedbutton in the top-right corner. Once on that screen, and within theConnect your Warehousetab, click theConnect your data warehouse to Eppobutton in the bottom right-hand corner of the screen. - Once on the data warehouse connection screen, click the
Snowflaketab. From there, you should be prompted to enter all of the necessary information for doing so. This information includes:
- Server - everything before the
.snowflakecomputing.comin the customer's snowflake URL. For example, if your Snowflake account URL ismy-company.us-east-1.snowflakecomputing.comthen the value to enter ismy-company.us-east-1. - Warehouse - from inside your Snowflake instance, click the Warehouses item from the menu -- choose from among the listed warehouses
- Database - Database name from step 3 in the previous section
- Schema -
eppo_output - Username -
eppo_user - Role -
eppo_role
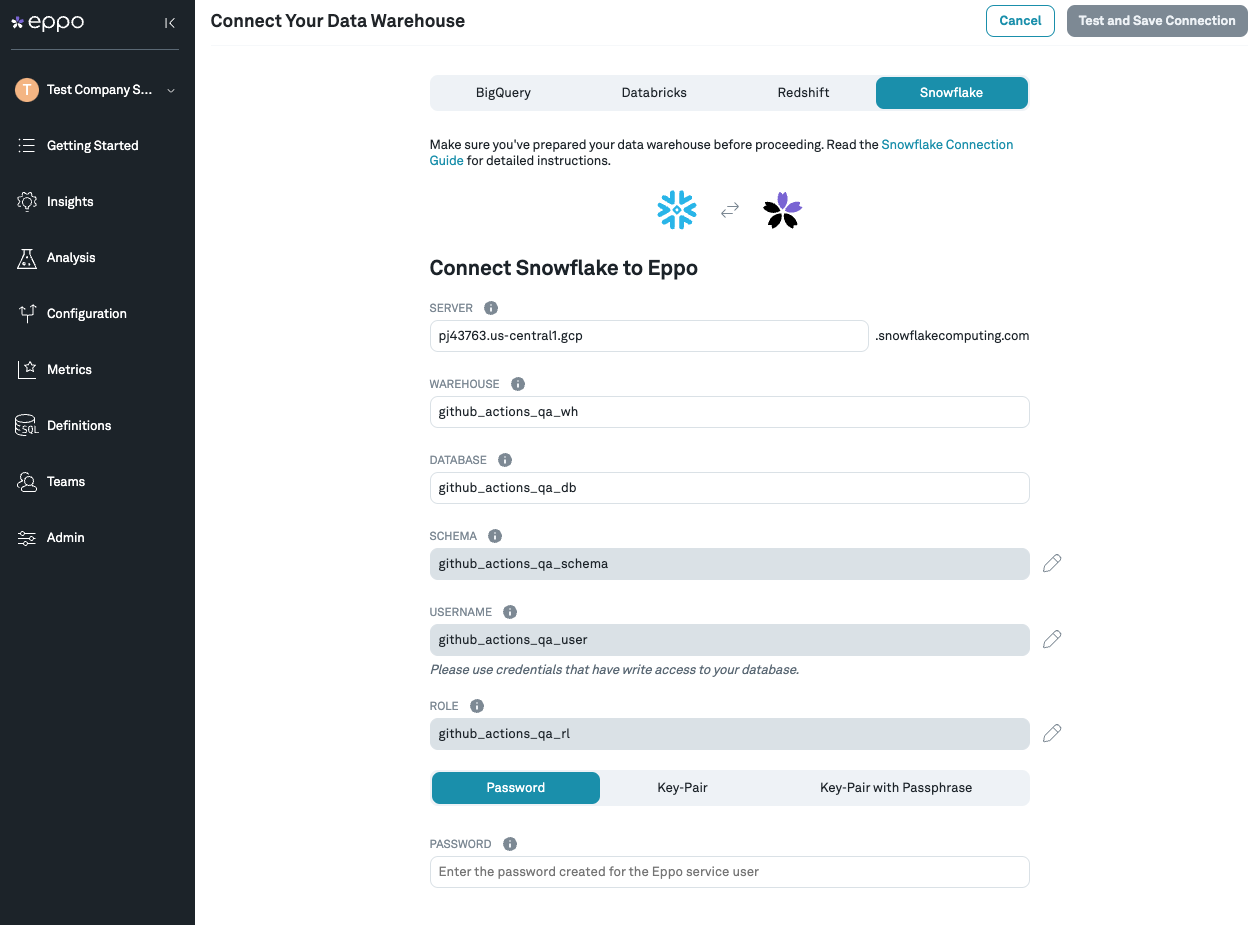
Authentication with Password:
- Password - the
<password>you chose
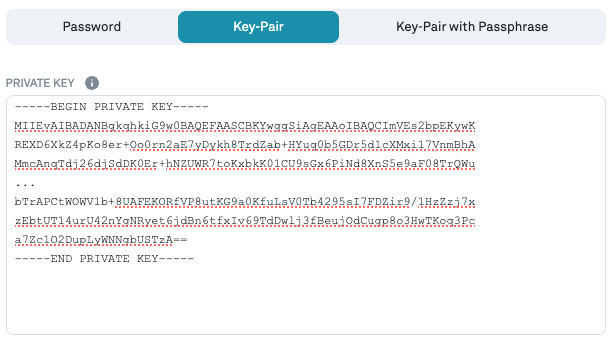
Authentication with Key-pair:
Include the header and footers.
-----BEGIN PRIVATE KEY-----
MIIEv...
...
-----END PRIVATE KEY-----
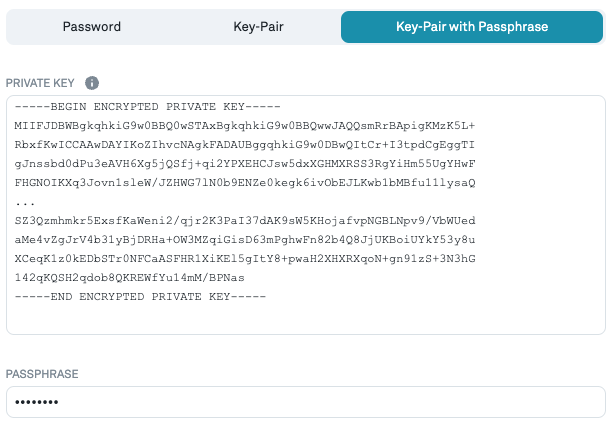
Authentication with Encrypted Key-pair:
Include the header and footers.
-----BEGIN ENCRYPTED PRIVATE KEY-----
MIIFJDBWBg...
...
-----END ENCRYPTED PRIVATE KEY-----
- Passcode - the
<passcode>for the encrypted key-pair
- Enter the values into the form (which should look like the screenshot below), then click
Test Connection. Once this test succeeds, save your settings by clickingTest and Save Connection.
Note: Eppo uses Google Secret Manager to store and manage your credentials. Credentials are never stored in plaintext, and Secret Manager can only be accessed via authorized roles in GCP, where all usage is monitored and logged.
Updating Credentials
Credentials can be updated at any time within the Admin panel of the app.